
Converting a shed into a tiny house, you’ll need to follow local building codes and obtain necessary permits first. Select a shed at least 10×20 feet with adequate vertical clearance, then reinforce the structure with proper blocking and insulation. Install code-compliant electrical, plumbing, and HVAC systems while ensuring proper ventilation. Add interior finishes and maximize space with vertical storage solutions. Following these critical steps will help you create a safe, efficient living space that meets all regulations.
Key Takeaways
- Verify local zoning laws and obtain necessary permits before starting any conversion work to ensure legal compliance.
- Select a structurally sound shed of at least 10×20 feet with adequate height for comfortable living space.
- Install proper insulation, electrical wiring, and plumbing systems according to building codes and safety standards.
- Implement efficient ventilation through exhaust fans and windows while ensuring moisture control throughout the structure.
- Maximize space with multi-functional furniture and vertical storage solutions while maintaining required emergency exit clearances.
Planning Your Shed-to-Home Conversion
When starting on a shed-to-home conversion, you’ll need to carefully evaluate several critical factors before beginning any construction work. Your first step is establishing a realistic budget for conversion that accounts for materials, labor, and potential contractor costs.
Next, you’ll need to research local zoning regulations and secure necessary building permits to guarantee your shed into tiny house project complies with municipal codes. Select an appropriate location that allows for utility connections and meets setback requirements. Consider the shed size carefully – it must accommodate your planned interior layout while maintaining proper clearances for safety and comfort.
Create detailed design ideas that maximize the available space, including placement of essential features like bathroom, kitchen, and sleeping areas. Don’t overlook the importance of a solid foundation – a properly engineered concrete slab will support your structure and facilitate utility installations. Your planning phase should also address ventilation, insulation, and electrical requirements to meet residential building standards.
Legal Requirements and Permits
Three essential legal requirements must be guaranteed before converting your shed into a tiny house: zoning compliance verification, building permits, and utility connection approvals.
Start by researching your local zoning laws to confirm whether residential conversions are permitted in your area. You’ll need to obtain specific building codes and requirements from your local authorities before proceeding with any modifications. If you’re working with a prefab shed, you may face fewer permit restrictions, but don’t assume this without verification.
Pay special attention to utility connections, as these often require separate permits and inspections. Water hookups typically need basic permits, while sewage systems demand more complex documentation and planning. Remember that skipping any required permits can result in hefty fines or mandatory structure removal. To guarantee a smooth conversion process, create a checklist of all necessary permits and maintain strict compliance with local regulations throughout your project.
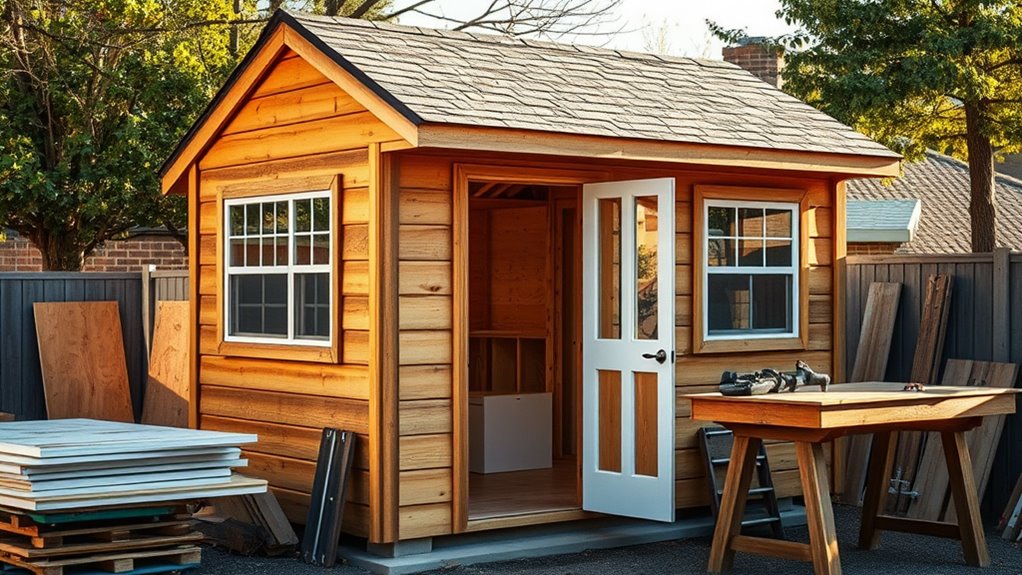
Choosing the Right Shed Structure
Now that your permit requirements are in order, selecting an appropriate shed structure becomes the foundation of your tiny house project. When choosing the right shed, you’ll need to take into account a minimum size of 10×20 feet to provide adequate living space. The Tall Barn and Gable styles offer ideal vertical clearance for loft additions and storage solutions.
| Feature | Requirements | Benefits |
|---|---|---|
| Size | 10×20 feet minimum | Accommodates kitchen/bath |
| Style | Tall Barn/Gable | Allows loft space |
| Materials | High-quality wood/metal | Guarantees durability |
| Structure | Building code compliant | Meets safety standards |
| Type | Prefabricated | Simpler permit process |
Remember to verify that your chosen structure aligns with local zoning laws and building codes. Prefabricated sheds often streamline the approval process compared to custom builds, making them an attractive option for conversion projects. Focus on quality materials and construction techniques to assure long-term structural integrity and safety compliance.
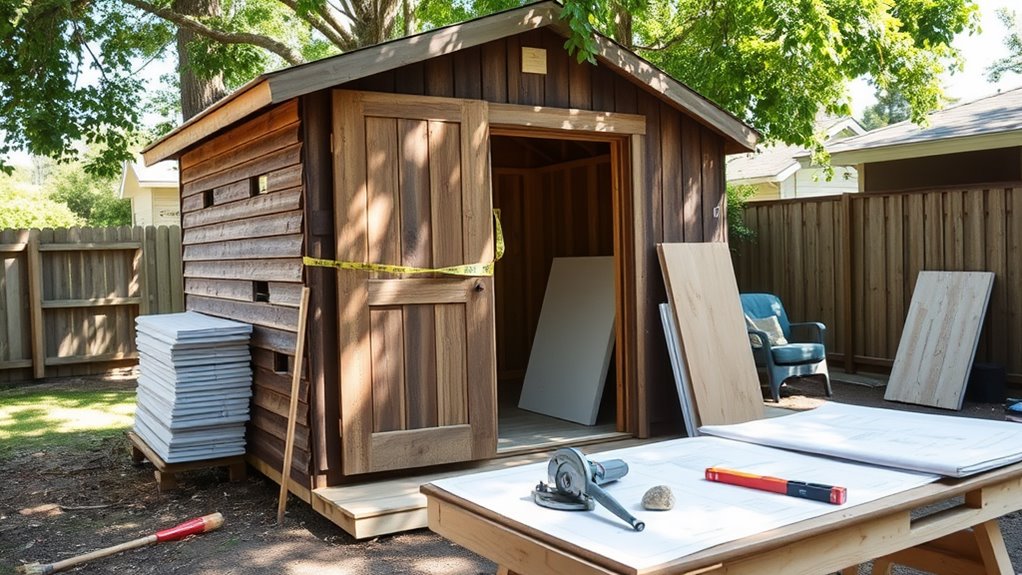
Essential Structural Modifications
Converting your shed into a habitable living space requires several critical structural modifications to meet residential building codes and safety standards. Your first essential structural modification should focus on reinforcing its structure with deadwood or blocking to maintain stability and load-bearing capacity.
Before proceeding with interior layout changes, you’ll need to implement proper insulation. Closed-cell spray foam is your best choice, as it provides superior moisture control and energy efficiency. When planning your electrical system, verify you’re meeting local regulations by installing adequate outlets and safety features throughout the space.
Plumbing installation demands professional expertise to comply with local codes and guarantee proper functionality. You’ll need to carefully plan water supply lines and drainage systems. As you make these modifications, consider how the interior layout will accommodate separate living areas while maximizing functionality and comfort. Each structural change must prioritize safety while creating a sustainable living environment.
Installing Utilities and Systems
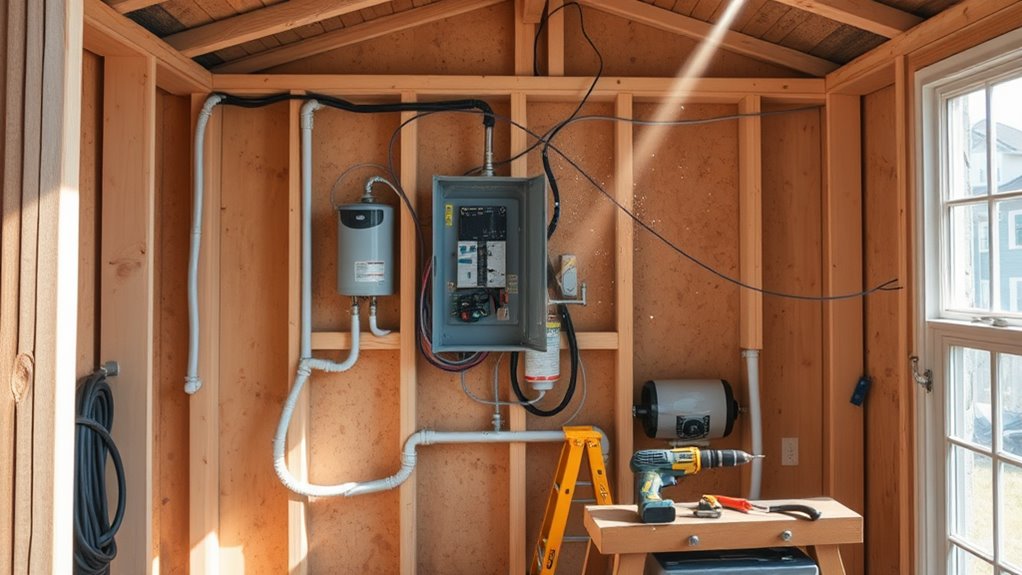
Installing utilities in your shed conversion requires careful planning and strict adherence to local building codes, particularly for electrical systems where you’ll need 10-gauge wiring for runs over 50 feet. You’ll need to obtain proper permits and guarantee compliant installations for water lines, sewage connections, and electrical outlets throughout the space, with a composting toilet offering a simplified alternative to traditional plumbing. Your HVAC considerations should account for proper ventilation and climate control, which must be integrated with the electrical system while meeting all safety standards and inspection requirements.
Electrical Planning and Installation
Before running any electrical wiring through your shed conversion, you’ll need to carefully assess your power requirements and obtain the necessary permits from local authorities. Determine your total amperage needs, typically ranging from 50 to 100 amps, to adequately support your planned appliances and lighting systems.
Install 10-gauge wiring for runs exceeding 50 feet to prevent voltage drop and maintain efficient power delivery throughout your space. Position multiple electrical outlets strategically around your shed, following building codes and recommended spacing guidelines to prevent circuit overload. While you may handle some basic electrical work, it’s essential to hire a licensed electrician for connecting your shed’s electrical system to your home’s main power supply. This guarantees proper installation and compliance with safety regulations, protecting your investment and maintaining insurance coverage.
Plumbing System Setup
The plumbing system represents one of the most critical components in your shed-to-tiny-house conversion project. Before beginning any plumbing system setup, you’ll need to secure the necessary permits to comply with local building codes. Start by planning your water line installation from the main supply, guaranteeing proper depth and insulation to prevent freezing. Consider using PEX tubing for your internal plumbing due to its durability and ease of installation.
For sewage connections, you’ll need to decide between a composting toilet or traditional sewage system. If choosing traditional plumbing, make certain of proper slope for drainage when connecting to the main sewer line. Whatever option you select, it’s crucial to work with a licensed plumber who can verify that your installation meets all safety standards and will pass required inspections.
HVAC and Climate Control
With your plumbing system in place, climate control becomes the next major engineering challenge in your shed conversion. For ideal heating and cooling, consider installing a ductless mini-split HVAC system, which maximizes energy efficiency while minimizing space requirements. You’ll need to properly insulate your walls and ceiling using spray foam or bat insulation to maintain stable temperatures and reduce operational costs.
Before installing any HVAC components, verify local building codes and obtain necessary permits. If you’re working with limited space, you might opt for a combination of ceiling fans and portable heaters instead of a full system. Don’t forget to address ventilation – install exhaust fans or operable windows to combat moisture buildup and maintain healthy air circulation. This step is essential for preventing humidity-related issues and ensuring your tiny house remains comfortable year-round.
Insulation and Interior Finishing
Properly insulating your converted shed is an essential step that directly impacts both comfort and energy efficiency in your tiny house. Begin by applying spray foam insulation to your walls, ceiling, and floor, as it provides superior temperature regulation and moisture control. This all-encompassing approach guarantees your living space remains comfortable year-round while minimizing energy costs.
Once insulation is complete, install interior siding options like drywall or shiplap to create a polished look. Pay careful attention to sealing all drywall joints and gaps with silicone caulk to prevent air leaks and pest intrusion. This step is vital for maintaining the energy-efficient qualities of your insulation system.
Finally, install durable flooring that suits your needs. Water-resistant vinyl plank or engineered hardwood are excellent choices for tiny houses, offering both functionality and aesthetic appeal. Remember to properly seal the flooring connections to maintain the integrity of your insulation barrier.
Design Elements and Space Optimization
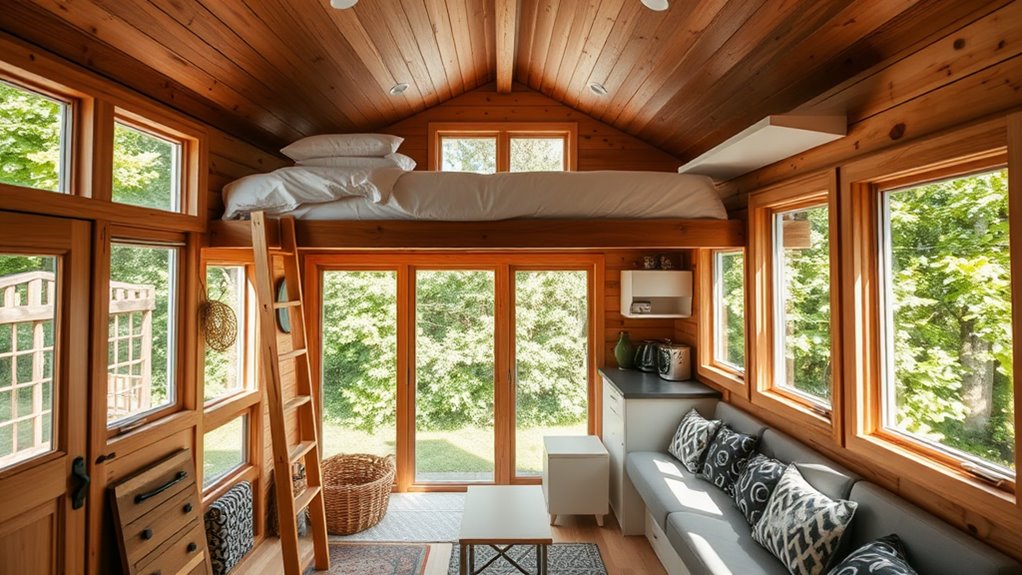
To maximize your tiny house’s limited footprint, you’ll need to implement strategic vertical storage solutions, including code-compliant wall-mounted shelving systems and secure overhead cabinets that extend to the ceiling. Your furniture layout must prioritize multi-functional pieces that meet safety standards, such as properly anchored convertible sofas and collapsible tables that can support adequate weight loads. These space-optimization techniques, when properly executed according to local building codes, will help you achieve a safe and efficient living environment while maintaining necessary clearance zones for emergency egress.
Maximizing Vertical Storage Solutions
Since every inch matters in a tiny house conversion, vertical storage solutions become essential for maximizing your shed’s limited square footage. Install wall-mounted shelves and cabinets that extend to the ceiling, guaranteeing they’re properly anchored to support heavy loads. Consider incorporating a lofted sleeping area with built-in storage underneath, but verify it meets local building codes for ceiling height and load-bearing requirements.
- Multi-functional furniture that folds vertically against walls, like Murphy beds and drop-leaf tables
- Floor-to-ceiling bookcases with adjustable shelving that double as room dividers
- Industrial-grade pegboards and hooks rated for tools and equipment storage
When adapting limited space, prioritize efficient storage solutions that maximize vertical space while maintaining proper clearances and safety standards. Ascertain all installations comply with structural requirements and weight limitations for your specific shed conversion.
Multi-Purpose Furniture Layouts
When converting a shed into a tiny house, maximizing every square foot requires strategic placement of multi-purpose furniture that adapts to your daily activities. You’ll need to integrate dual-purpose fixtures and convertible pieces that comply with local building codes while maintaining clear pathways for safety.
| Time | Space Function | Furniture Configuration |
|---|---|---|
| Morning | Sleeping Area | Folded Murphy Bed Up |
| Noon | Dining Space | Extended Table/Chairs |
| Afternoon | Home Office | Workspace Configuration |
| Evening | Living Room | Convertible Sofa Open |
| Night | Bedroom | Murphy Bed Down |
Incorporate built-in storage solutions beneath seating areas and utilize vertical storage space above multi-purpose furniture. Select pieces like convertible sofa beds with safety latches and well-planned layouts featuring rolling furniture to guarantee efficient traffic flow. Your furniture arrangement should maintain a minimum 36-inch clearance for emergency egress while maximizing the limited space in your shed conversion.
Conclusion
Your shed-to-home transformation isn’t just about converting walls and adding windows – it’s about building a safe haven that meets all local building codes and safety standards. Like a butterfly emerging from its chrysalis, your shed will evolve into a fully compliant dwelling through careful attention to structural integrity, proper utility installations, and adherence to residential requirements. Remember, it’s vital to document every modification and maintain detailed records of all permits and inspections.


